mybatis-plus入门
- Guide
Mybatis-Plus 概述
MyBatis-Plus(简称 MP)是一个 MyBatis 的增强工具,使用 MyBatis-Plus 不再需要我们手写 SQL 与 Mapper 文件,极大的简化开发,提高效率。
Mybatis-Plus 快速入门
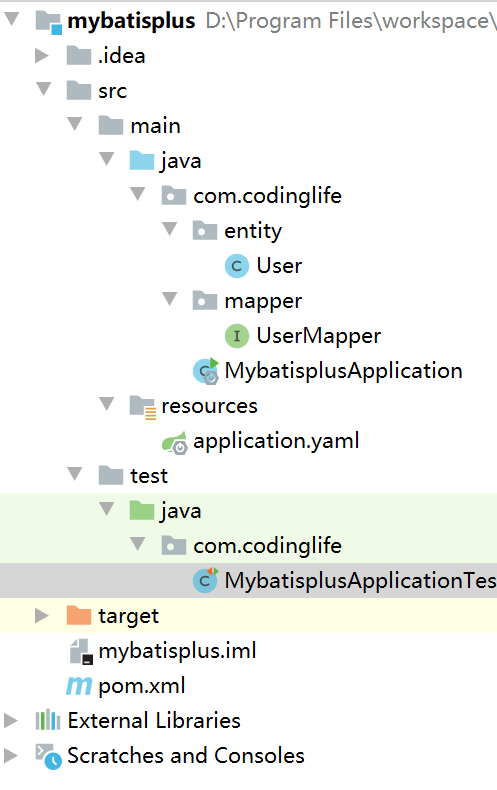
创建一个简单的 SpringBoot 项目mybatisplus来读取用户表 User 中的数据,项目工程结构如下:

项目集成 Mybatis-Plus 步骤如下:
创建数据库
mybatis_plusDROP TABLE IF EXISTS user; CREATE TABLE user ( id BIGINT(20) NOT NULL COMMENT '主键ID', name VARCHAR(30) NULL DEFAULT NULL COMMENT '姓名', age INT(11) NULL DEFAULT NULL COMMENT '年龄', email VARCHAR(50) NULL DEFAULT NULL COMMENT '邮箱', PRIMARY KEY (id) ); DELETE FROM user; INSERT INTO user (id, name, age, email) VALUES (1, 'Jone', 18, 'test1@baomidou.com'), (2, 'Jack', 20, 'test2@baomidou.com'), (3, 'Tom', 28, 'test3@baomidou.com'), (4, 'Sandy', 21, 'test4@baomidou.com'), (5, 'Billie', 24, 'test5@baomidou.com');idea 初始化一个 SpringBoot 工程,SpringBoot 版本
2.6.3,groupId为com.codinglife,artifactId为mybatisplus
pom.xml文件引入项目依赖<dependency> <groupId>org.springframework.boot</groupId> <artifactId>spring-boot-starter</artifactId> </dependency> <dependency> <groupId>org.springframework.boot</groupId> <artifactId>spring-boot-starter-test</artifactId> <scope>test</scope> </dependency> <!--MybatisPlus--> <dependency> <groupId>com.baomidou</groupId> <artifactId>mybatis-plus-boot-starter</artifactId> <version>3.5.1</version> </dependency> <!--mysql--> <dependency> <groupId>mysql</groupId> <artifactId>mysql-connector-java</artifactId> </dependency> <!--Lombok--> <dependency> <groupId>org.projectlombok</groupId> <artifactId>lombok</artifactId> </dependency>Lombok 注解参考Lombok 注解
yaml文件application.yaml配置数据源和 mybatis 日志# 数据源 spring: datasource: driver-class-name: com.mysql.cj.jdbc.Driver url: jdbc:mysql://localhost:3306/mybatis_plus?serverTimezone=UTC&useUnicode=true&characterEncoding=utf-8 username: root password: 1234 # mybatis 日志 mybatis-plus: configuration: log-impl: org.apache.ibatis.logging.stdout.StdOutImpl构建实体类 User
import lombok.Data;

@Data // lombok 注解
@NoArgsConstructor
@AllArgsConstructor
public class User {
    private Long id;
    private String name;
    private Integer age;
    private String email;

    public User(String name, Integer age, String email) {
        this.name = name;
        this.age = age;
        this.email = email;
    }
}
编写实体类 User 对应的 Mapper 接口
@Repository
public interface UserMapper extends BaseMapper<User> {

}
应用入口增加注解扫描
@MapperScan@SpringBootApplication @MapperScan("com.codinglife.mapper") public class MybatisplusApplication { public static void main(String[] args) { SpringApplication.run(MybatisplusApplication.class, args); } }编写测试类
@Test
    public void testSelect() {
        System.out.println(("----- selectAll method test ------"));
        // 查询 User 表所有数据
        List<User> userList = userMapper.selectList(null);
        Assertions.assertEquals(5, userList.size());
        userList.forEach(System.out::println);
    }
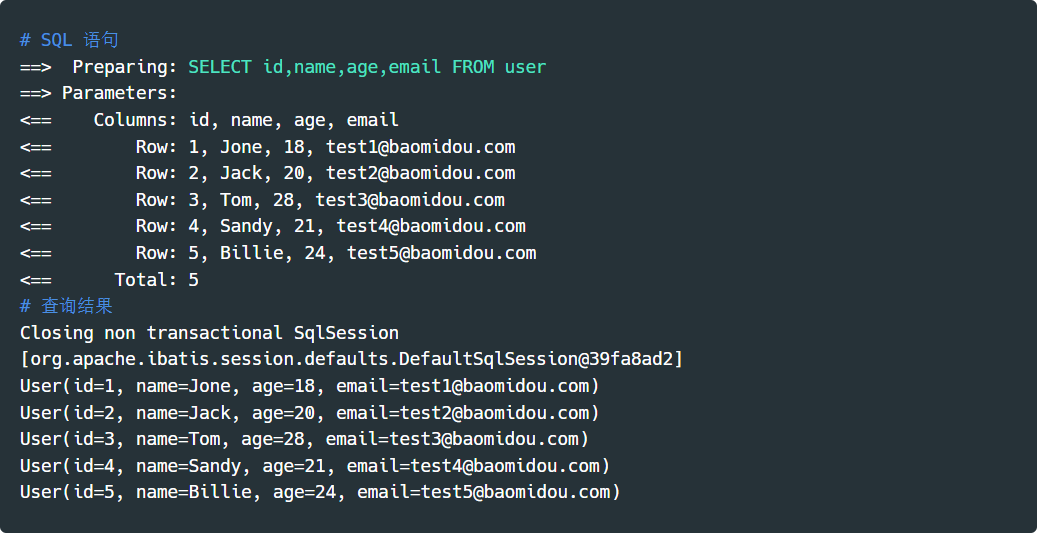
测试结果输出

Mapper CRUD 接口
当我们构建了一个简单的集成 Mybatis-Plus 的 SpringBoot 项目之后,便可以测试一系列数据库操作
插入insert
针对 user 表插入一条数据,插入insert操作步骤如下:
对需要插入数据的数据表设置主键自增

可以在创建表的时候使用
auto_increment设置主键自增CREATE TABLE user ( id BIGINT(20) NOT NULL AUTO_INCREMENT COMMENT '主键ID', ... );使用
@TableId注解,对user表对应的 User 实体类设置主键自增策略,更改为AUTO(数据库ID自增)@Data @NoArgsConstructor public class User { @TableId(type = IdType.AUTO) private Long id; //...省略 }Tips
MyBatis-Plus 默认的主键策略是
ID_WORKER(全局唯一策略),如果不使用@TableId(type = IdType.AUTO),会自动生成一个全局唯一的ID:
编写测试类代码
@Test public void testInsert() { User user = new User("CodingLife", 18, "wyj_program@163.com"); int result = userMapper.insert(user); System.out.println("影响的行数 : " + result); System.out.println(user); }T为实体对象,插入方法如下:int insert(T entity);
更新Update
通过id号,对user表的某一条数据进行更改,步骤如下:
编写测试代码
updateById()@Test public void testUpdateById() { User user = new User(); user.setId(1L); user.setAge(30); // 根据 ID 更新数据库表信息 int result = userMapper.updateById(user); System.out.println("影响的行数 : " + result); }使用方法
updateById()如下,T为实体对象// 根据 ID 修改 int updateById(@Param(Constants.ENTITY) T entity);
查询Select
编写测试代码
testSelect()@Test public void testSelect() { System.out.println("查询表中所有数据: "); List<User> userList = userMapper.selectList(null); userList.forEach(System.out::println); User user = userMapper.selectList(1L); System.out.println("根据Id查询: " + user); List<User> users = userMapper.selectBatchIds(Arrays.asList(1, 2, 3)); System.out.println("批量查询: "); users.forEach(System.out::println); }方法列表:
类型 参数名 描述 T entity 实体对象 (set 条件值,可为 null) Wrapper updateWrapper 实体对象封装操作类(可以为 null,里面的 entity 用于生成 where 语句) // 根据 ID 查询 T selectById(Serializable id); // 根据 entity 条件,查询一条记录 T selectOne(@Param(Constants.WRAPPER) Wrapper<T> queryWrapper); // 查询(根据ID 批量查询) List<T> selectBatchIds(@Param(Constants.COLLECTION) Collection<? extends Serializable> idList); // 根据 entity 条件,查询全部记录 List<T> selectList(@Param(Constants.WRAPPER) Wrapper<T> queryWrapper); // 查询(根据 columnMap 条件) List<T> selectByMap(@Param(Constants.COLUMN_MAP) Map<String, Object> columnMap); // 根据 Wrapper 条件,查询全部记录 List<Map<String, Object>> selectMaps(@Param(Constants.WRAPPER) Wrapper<T> queryWrapper); // 根据 Wrapper 条件,查询全部记录。注意: 只返回第一个字段的值 List<Object> selectObjs(@Param(Constants.WRAPPER) Wrapper<T> queryWrapper); // 根据 entity 条件,查询全部记录(并翻页) IPage<T> selectPage(IPage<T> page, @Param(Constants.WRAPPER) Wrapper<T> queryWrapper); // 根据 Wrapper 条件,查询全部记录(并翻页) IPage<Map<String, Object>> selectMapsPage(IPage<T> page, @Param(Constants.WRAPPER) Wrapper<T> queryWrapper); // 根据 Wrapper 条件,查询总记录数 Integer selectCount(@Param(Constants.WRAPPER) Wrapper<T> queryWrapper);
删除 delete
Mybatis-Plus提供了以下删除方法:
// 根据 entity 条件,删除记录
int delete(@Param(Constants.WRAPPER) Wrapper<T> wrapper);
// 删除(根据 ID 批量删除)
int deleteBatchIds(@Param(Constants.COLLECTION) Collection<? extends Serializable> idList);
// 根据 ID 删除
int deleteById(Serializable id);
// 根据 columnMap 条件,删除记录
int deleteByMap(@Param(Constants.COLUMN_MAP) Map<String, Object> columnMap);
参数说明:
| 类型 | 参数名 | 描述 |
|---|---|---|
| Wrapper | wrapper | 实体对象封装操作类(可以为 null) |
| Collection<? extends Serializable> | idList | 主键 ID 列表(不能为 null 以及 empty) |
| Serializable | id | 主键 ID |
| Map<String, Object> | columnMap | 表字段 map 对象 |
测试代码如下:
测试
deleteById(),根据 ID 删除记录@Test public void testDeleteByID() { // 删除 ID=6 的记录 int result = userMapper.deleteById(6L); System.out.println(result); }测试
deleteBatchIds(),根据 ID 批量删除记录@Test public void testDeleteBatchIds() { // 批量删除 ID=3, 4, 5 的记录 int result = userMapper.deleteBatchIds(Arrays.asList(3, 4, 5)); System.out.println(result); }测试
deleteByMap(),根据条件查询删除@Test public void testDeleteByMap() { // 删除 user 表 name=Jack, age=20 的记录 HashMap<String, Object> map = new HashMap<>(); map.put("name", "Jack"); map.put("age", 20); int result = userMapper.deleteByMap(map); System.out.println(result); }
扩展与插件使用
字段自动填充
有时候,数据库中的某一张表的某些字段,往往需要自动更新其信息,比如字段createTime,当我们插入一条数据时,需要自动生成创建时间;又例如字段updateTime,当我们对某一条数据进行更新时,需要自动更新该字段信息。
Mybatis-Plus 提供了字段自动填充,继续使用项目 mybatisplus ,对 user 表新增两个字段 createTime和updateTime来测试字段自动填充功能,步骤如下:
对 user 表新增字段
createTime和updateTimeALTER TABLE `user` ADD COLUMN `createTime` datetime; ALTER TABLE `user` ADD COLUMN `updateTime` datetime对实体类
User新增属性createTime和updateTime,并使用注解@TableField标明其自动填充方式@Data @NoArgsConstructor @AllArgsConstructor public class User { //...省略 @TableField(fill = FieldFill.INSERT) private Date createTime; @TableField(fill = FieldFill.INSERT_UPDATE) private Date updateTime; //...省略 }FieldFill 可选参数 含义 DEFAULT 默认不处理 INSERT 插入时填充字段 UPDATE 更新时填充字段 INSERT_UPDATE 插入和更新时填充字段 编写自动填充配置类
AutoFillConfig,实现接口MetaObjectHandler@Component public class AutoFillConfig implements MetaObjectHandler { private static final Logger log = LoggerFactory.getLogger(AutoFillConfig.class); @Override public void insertFill(MetaObject metaObject) { log.info("start insert fill ...."); // 自动填充属性 createTime this.strictInsertFill(metaObject, "createTime", Date.class, new Date()); } @Override public void updateFill(MetaObject metaObject) { log.info("start update fill ...."); this.strictUpdateFill(metaObject, "updateTime", Date.class, new Date()); } }编写测试代码
@Test
public void testAutoFill() {
    User user = new User(null, "CodingLife", 35, "1013801973@qq.com", null, null);
    System.out.println("插入时自动填充 createTime : ");
    System.out.println( userMapper.insert(user) );

    user.setAge(36);
    System.out.println("更新时自动填充 updateTime : ");
    System.out.println(userMapper.updateById(user));
}
逻辑删除
有时候,为了方便数据恢复和保护数据本身价值,我们并不会真正意义上的删除数据库表中的数据(物理删除),而是为数据库表增加一个字段deleted,当删除一行记录时,不执行 DELETE 操作,而是执行更新UPDATE操作,将该行记录的deleted字段设置为1,deleted=1的含义为该行记录被删除,这便是逻辑删除。
知识点
1、逻辑删除只对自动注入的 SQL 起效:
插入操作:不作限制
查找:追加 where 条件过滤掉已删除数据,且使用 wrapper.entity 生成的 where 条件会忽略该字段
select id,name,deleted from user where deleted=0更新:追加 where 条件防止更新到已删除数据,且使用 wrapper.entity 生成的 where 条件会忽略该字段
删除:转变为更新
update user set deleted=1 where id = 1 and deleted=0
2、逻辑删除实际就是删除
3、支持所有数据类型(推荐使用 Integer,Boolean,LocalDateTime)
逻辑删除使用步骤如下:
数据库中添加
deleted字段ALTER TABLE `user` ADD COLUMN `deleted` tinyint数据库表对应实体类添加
deleted属性,并使用@TableLogic标明其为逻辑删除属性public class User { //... @TableLogic @TableField(fill = FieldFill.INSERT) private Integer deleted; //... }自动填充配置类
AutoFillConfig中添加deleted属性插入操作的的默认值@Override public void insertFill(MetaObject metaObject) { //... // 自动填充属性 deleted this.strictInsertFill(metaObject, "deleted", Integer.class, 0); }application.yaml文件中配置逻辑删除值mybatis-plus: global-config: db-config: logic-delete-field: deleted # 全局逻辑删除的实体字段名 logic-delete-value: 1 # 逻辑已删除值(默认为 1) logic-not-delete-value: 0 # 逻辑未删除值(默认为 0)Tips
Mybatis-Plus 3.3.0 之后,如果配置了
logic-delete-field,则不需要在实体类上使用@TableLogic注解了编写测试代码
@Test
public void  testLogicDelete() {
    int result = userMapper.deleteById(1L);
    System.out.println(result);
}
删除前
deleted=0,删除后deleted=1

乐观锁的实现—版本号机制
情景
假设有如下场景,有两处火车票售票点,同时读取某一趟列车车票数据库中车票余额为 X。两处售票点同时卖出一张车票,同时修改余额为 X -1写回数据库,这样就造成了实际卖出两张火车票而数据库中的记录却只少了一张。
产生这种情况的原因是因为两个事务读入同一数据并同时修改,其中一个事务提交的结果破坏了另一个事务提交的结果,导致其数据的修改被丢失,破坏了事务的隔离性。乐观锁的实现可以解决以上问题,而版本号机制是实现乐观锁的方式之一
知识点
版本号机制的实现方式如下:
- 取出记录时,获取当前 version
- 更新时,带上这个 version
- 执行更新时, set version = newVersion where version = oldVersion
- 如果 version 不对,就更新失败
继续使用项目 mybatisplus ,使用版本号机制测试乐观锁的实现,具体步骤如下:
对
user表新增字段 versionALTER TABLE `user` ADD COLUMN `version` INT对实体类
User新增属性version,并使用@Version注解来标注该字段为乐观锁字段@Data @NoArgsConstructor @AllArgsConstructor public class User { //...省略 @Version @TableField(fill = FieldFill.UPDATE) private Integer version; //...省略 }自动填充配置类
AutoFillConfig方法updateFill(MetaObject)中新增属性version的更新时自动填充代码public void updateFill(MetaObject metaObject) { // ... // 自动填充属性 version this.strictUpdateFill(metaObject, "version", Integer.class, 1); }编写 Mybatis-Plus 插件配置类
MybatisPlusConfig,添加乐观锁插件@Configuration @MapperScan("com.codinglife.mapper") public class MybatisPlusConfig { @Bean public MybatisPlusInterceptor mybatisPusInterceptor() { MybatisPlusInterceptor interceptor = new MybatisPlusInterceptor(); // 乐观锁插件 interceptor.addInnerInterceptor(new OptimisticLockerInnerInterceptor()); return interceptor; } }编写测试乐观锁代码并测试
@Test
public void testOptimisticLocker() {
    User user = userMapper.selectById(1L);
    user.setName("codeLifeV");
    // 更新 user 表 ID=1 的记录的名字
    userMapper.updateById(user);
}

修改测试代码,模拟更新数据时,当前版本号和数据库版本号不一致导致数据更新失败
@Test
public void testOptimisticLocker() {
    // 拿到数据库 ID=1 的记录, 同时拿到当前记录的版本号 oldVersion = 1
    User user = userMapper.selectById(1L);
    // 更新该条记录的信息
    user.setName("codeLifeV");

    // 模拟事务 X 对该条记录进行了修改, 并使当前数据库的版本号增 1, 此时 version = 2
    User user2 = userMapper.selectById(1L);
    user2.setName("codeLifeVV");
    userMapper.updateById(user2);

    // 当前事务更新数据, 发现 oldVersion 不等于 version
    userMapper.updateById(user);
}

分页插件
当数据库表中的数据过多时,我们往往需要设置内容分页,MybatisPlus中集成了分页插件,具体使用步骤如下:
Mybatis-Plus 插件配置类
MybatisPlusConfig下添加分页插件@Configuration @MapperScan("com.codinglife.mapper") public class MybatisPlusConfig { @Bean public MybatisPlusInterceptor mybatisPlusInterceptor() { MybatisPlusInterceptor interceptor = new MybatisPlusInterceptor(); // ... 省略 // 分页插件 interceptor.addInnerInterceptor(new PaginationInnerInterceptor(DbType.MYSQL)); return interceptor; } }Tips
参数
DbType为数据库类型编写分页测试代码,测试方法
selectPage()@Test public void testPagePlugin() { // 根据 entity 条件, 分页查询获取全部数据 Page<User> page = new Page<User>(1,2); userMapper.selectPage(page, null); page.getRecords().forEach(System.out::println); System.out.println("获取分页信息: "); System.out.println("总条数" + page.getTotal()); System.out.println("当前页码" + page.getCurrent()); System.out.println("总页码" + page.getPages()); System.out.println("每页显示的条数" + page.getSize()); System.out.println("是否有上一页" + page.hasPrevious()); System.out.println("是否有下一页" + page.hasNext()); }selectPage(...)方法如下:/** * 根据 entity 条件,查询全部记录(并翻页) * * @param page 分页查询条件(可以为 RowBounds.DEFAULT) * @param queryWrapper 实体对象封装操作类(可以为 null) */ <P extends IPage<T>> P selectPage(P page, @Param(Constants.WRAPPER) Wrapper<T> queryWrapper);编写分页测试代码,测试方法
selectMapsPage()@Test public void testPagePlugin() { // 分页查询获取全部记录, 数据封装在 Map 集合中 IPage<Map<String, Object>> page = new Page<>(1, 5); IPage<Map<String, Object>> mapIPage = userMapper.selectMapsPage(page, null); mapIPage.getRecords().forEach(System.out::println); System.out.println("获取分页信息: "); System.out.println("总条数" + page.getTotal()); System.out.println("当前页码" + page.getCurrent()); System.out.println("总页码" + page.getPages()); System.out.println("每页显示的条数" + page.getSize()); }
条件构造器
使用条件构造器可以进行一些复杂的条件查询
参考官网地址:条件构造器 | MyBatis-Plus (baomidou.com)
代码生成器
使用 Mybatis-Plus 代码生成器可以自动为我们生成Controller相关类、实体类、Mapper接口和对应XML,以及Service相关类,我们只需要进行简单的配置一些规则即可。
创建SpringBoot项目mybatisplus-generator,项目的groupId为com.codinglife,artifactId为mybatisplus-generator,JDK 版本为17,演示代码生成器的使用过程:
准备好需要生成代码的数据库表,此处演示使用代码生成器生成数据库
edu下表edu_teacher对应的代码CREATE TABLE `edu_teacher` ( `id` char(19) NOT NULL COMMENT '教师ID', `name` varchar(20) NOT NULL COMMENT '教师姓名', `intro` varchar(500) NOT NULL DEFAULT '' COMMENT '教师简介', `level` int(10) unsigned NOT NULL COMMENT '教师头衔 1-助教 2-讲师 3-副教授 4-教授', `avatar` varchar(255) DEFAULT NULL COMMENT '教师头像', `sort` int(10) unsigned NOT NULL DEFAULT '0' COMMENT '排序', `is_deleted` tinyint(1) unsigned NOT NULL DEFAULT '0' COMMENT '逻辑删除 1(true)已删除, 0(false)未删除', `gmt_create` datetime NOT NULL COMMENT '创建时间', `gmt_modified` datetime NOT NULL COMMENT '更新时间', PRIMARY KEY (`id`), UNIQUE KEY `uk_name` (`name`) ) ENGINE=InnoDB DEFAULT CHARSET=utf8mb4 COMMENT='教师';pom.xml文件引入相关依赖<!--Mybatis-Plus--> <dependency> <groupId>com.baomidou</groupId> <artifactId>mybatis-plus-boot-starter</artifactId> <version>3.5.1</version> </dependency> <!--Mybatis-Plus 代码生成器--> <dependency> <groupId>com.baomidou</groupId> <artifactId>mybatis-plus-generator</artifactId> <version>3.5.1</version> </dependency> <!-- velocity 模板引擎, Mybatis Plus 代码生成器需要 --> <dependency> <groupId>org.apache.velocity</groupId> <artifactId>velocity-engine-core</artifactId> <version>2.3</version> </dependency> <!--MySQL 数据库驱动--> <dependency> <groupId>mysql</groupId> <artifactId>mysql-connector-java</artifactId> <version>8.0.20</version> </dependency>yaml.xml文件配置数据库连接# 数据库连接 spring: datasource: username: root password: 1234 url: jdbc:mysql://localhost:3306/edu?serverTimezone=UTC&useUnicode=true&characterEncoding=utf-8 driver-class-name: com.mysql.cj.jdbc.Driver # mybatis-plus 日志 mybatis-plus: configuration: log-impl: org.apache.ibatis.logging.stdout.StdOutImpl创建代码生成器类
CodeGeneratorpublic class CodeGenerator { /** * 全局配置 Builder */ private final GlobalConfig.Builder globalConfigBuilder; /** * 包配置 Builder */ private final PackageConfig.Builder packageConfigBuilder; /** * 策略配置 Builder */ private final StrategyConfig.Builder strategyConfigBuilder; /** * 数据源配置 */ private static final DataSourceConfig DATA_SOURCE_CONFIG = new DataSourceConfig .Builder( "jdbc:mysql://localhost:3306/edu?serverTimezone=UTC&useUnicode=true&characterEncoding=utf-8", "root", "1234" ).build(); public CodeGenerator() { globalConfigBuilder = globalConfig(); packageConfigBuilder = packageConfig(); strategyConfigBuilder = strategyConfig(); } /** * 全局配置 * @return */ private GlobalConfig.Builder globalConfig() { return new GlobalConfig.Builder() .fileOverride() //覆盖已生成文件 .outputDir("D:\\Program Files\\workspace\\idea2\\edu\\edu-service\\edu-service-edu" + "/src/main/java") //指定输出目录 .author("CodingLife") //作者名 .enableSwagger() //开启 Swagger 模式 .dateType(DateType.TIME_PACK) //时间策略 .commentDate("yyyy-MM-dd"); //注释日期 } /** * 包配置 */ private PackageConfig.Builder packageConfig() { return new PackageConfig.Builder() .parent("com.codinglife"); //父包名 } /** * 策略配置 * @return */ private StrategyConfig.Builder strategyConfig() { StrategyConfig.Builder strategyConfigBuilder = new StrategyConfig.Builder(); strategyConfigBuilder .addInclude("edu_teacher") // 设置需要生成的表名 .addTablePrefix("edu_", "is_") // 增加过滤表前缀 .enableCapitalMode(); // 开启大写命名 // 实体策略配置 strategyConfigBuilder .entityBuilder() .enableLombok() // 开启 Lombok .enableRemoveIsPrefix() // 开启 Boolean 类型字段移除 is 前缀 .enableTableFieldAnnotation() // 开启生成实体时生成字段注解 .naming(NamingStrategy.underline_to_camel) // 数据库表映射到实体的命名策略, 默认下划线转驼峰命名: NamingStrategy.underline_to_camel .versionColumnName("version") // 乐观锁字段名(数据库) .versionPropertyName("version") // 乐观锁属性名(实体) .logicDeleteColumnName("is_deleted") // 逻辑删除字段名(数据库) .logicDeletePropertyName("deleted") // 逻辑删除属性名(实体) .addTableFills(new Column("gmt_create", FieldFill.INSERT), // 添加表字段填充 new Column("gmt_modified", FieldFill.INSERT_UPDATE)); // Service 策略配置 strategyConfigBuilder .serviceBuilder() .formatServiceFileName("%sService"); // 去掉 Service 接口的首字母 I (默认) //.formatServiceImplFileName("%sServiceImp"); // 去掉 Service 实现类的首字母 I return strategyConfigBuilder; } @Test public void generator() { new AutoGenerator(this.DATA_SOURCE_CONFIG) // 全局配置 .global(this.globalConfigBuilder.build()) // 包配置 .packageInfo(this.packageConfigBuilder.build()) // 策略配置 .strategy(this.strategyConfigBuilder.build()) // 执行 .execute(); } }Tips
1、数据源配置
DATA_SOURCE_CONFIG处修改为自己的数据库url、username和password2、全局配置方法
globalConfig()中outputDir()指定生成的代码存放位置3、以上代码是基于Mybatis-Plus文档 代码生成器(新) | MyBatis-Plus (baomidou.com),适用版本
mybatis-plus-generator 3.5.1及其以上版本,对历史版本不兼容!3.5.1 以下的请参考 代码生成器旧4、代码生成器的具体配置参数参考代码生成器配置新 | MyBatis-Plus (baomidou.com)
编写测试代码并测试
@SpringBootTest
class MybatisplusGeneratorApplicationTest {
    @Test
    public void testMybatisPlusGenarator() {
        CodeGenerator codeGenerator = new CodeGenerator();
        codeGenerator.generator();
    }
}
代码执行完成之后便会生成相应代码:
生成前:

生成后:

