SpringCloud
SpringCloud概述
Spring Cloud 是一套完整的微服务解决方案,为开发人员提供了快速构建分布式系统中一些常见模式的工具,例如配置管理,服务发现,断路器,智能路由,微代理,控制总线,一次性令牌,全局锁定,领导选举,分布式会话,集群状态等,Spring Cloud 是在 SpringBoot 的基础上构建的,是一个基于 Spring Boot实现的开发工具。
Spring Cloud 本身并不是一个拿来即可用的框架,它是一套微服务规范,共有两代实现。
- Spring Cloud Netflix 是 Spring Cloud 的第一代实现,主要由 Eureka、Ribbon、Feign、Hystrix 等组件组成。
- Spring Cloud Alibaba 是 Spring Cloud 的第二代实现,主要由 Nacos、Sentinel、Seata 等组件组成
SpringCloud版本选择
SpringBoot 项目中使用 SpringCloud 构建分布式系统需要选择相应的版本,参考官方SpringCloud和SpringBoot对照版本引入依赖:
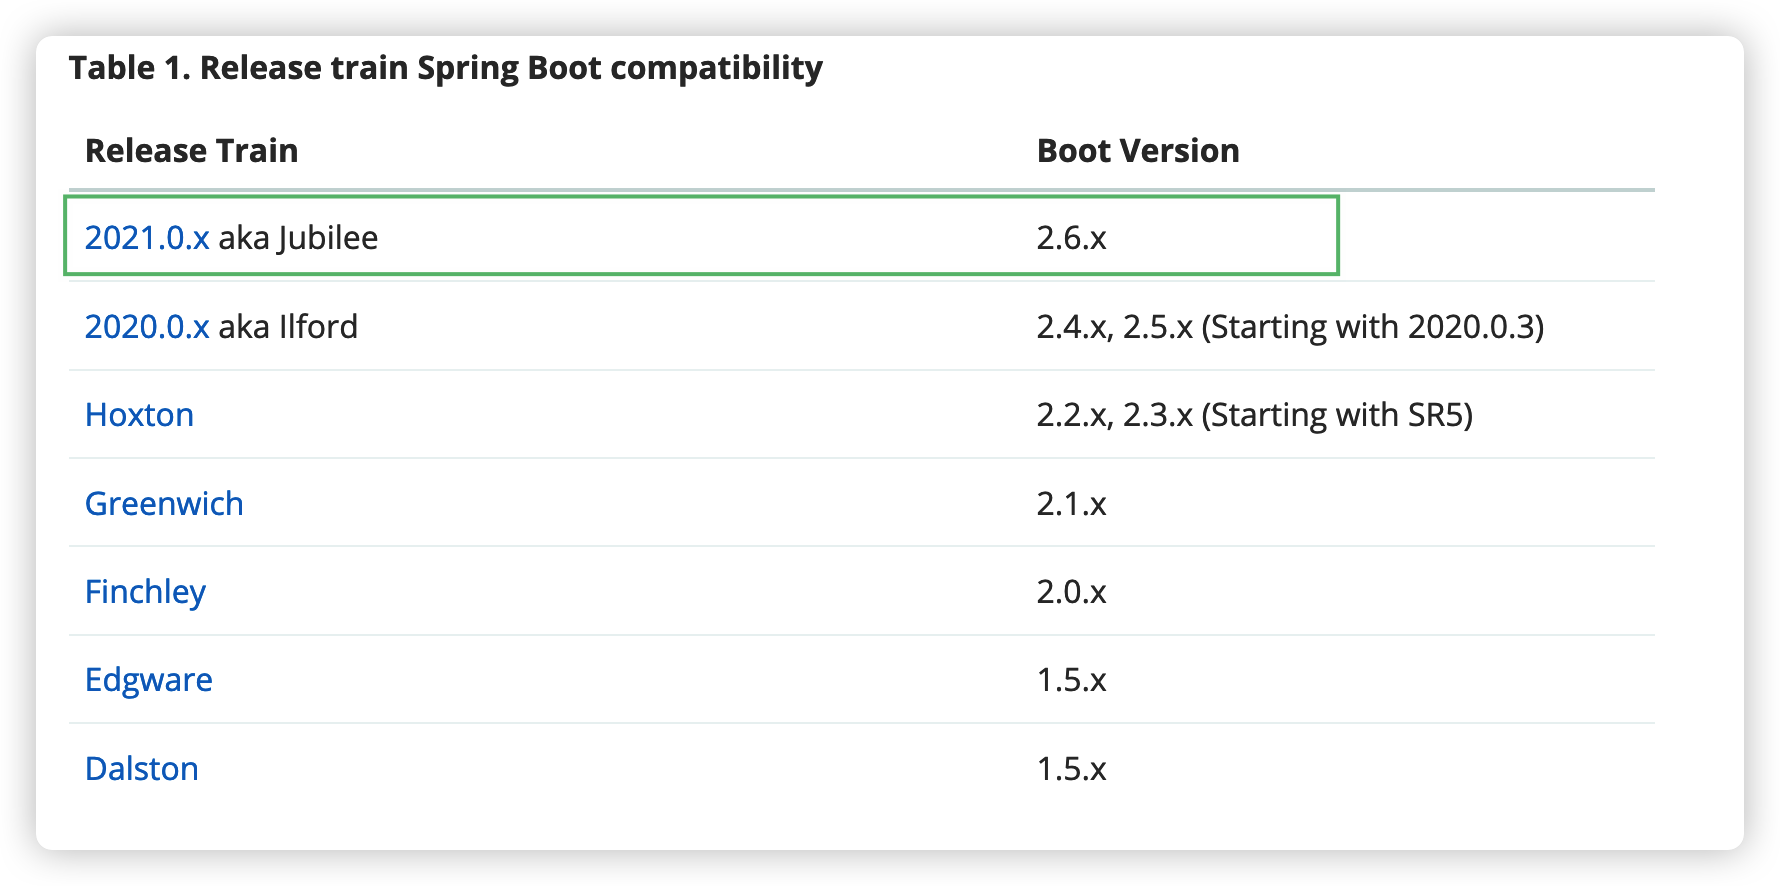
通过 Json方式展示SpringCloud版本对照 关系如下:

SpringCloud服务发现
Nacos概述
Nacos是Spring Cloud Alibaba组件,在 SpringCloud 中做服务注册中心组件,类似的还有Zookeeper、Consul,同时也是配置中心,比如 SpringCloud 中的 Config,将配置文件版本化管理,学习参考Nacos官方文档
官方解释
Nacos 致力于帮助您发现、配置和管理微服务。Nacos 提供了一组简单易用的特性集,帮助您快速实现动态服务发现、服务配置、服务元数据及流量管理
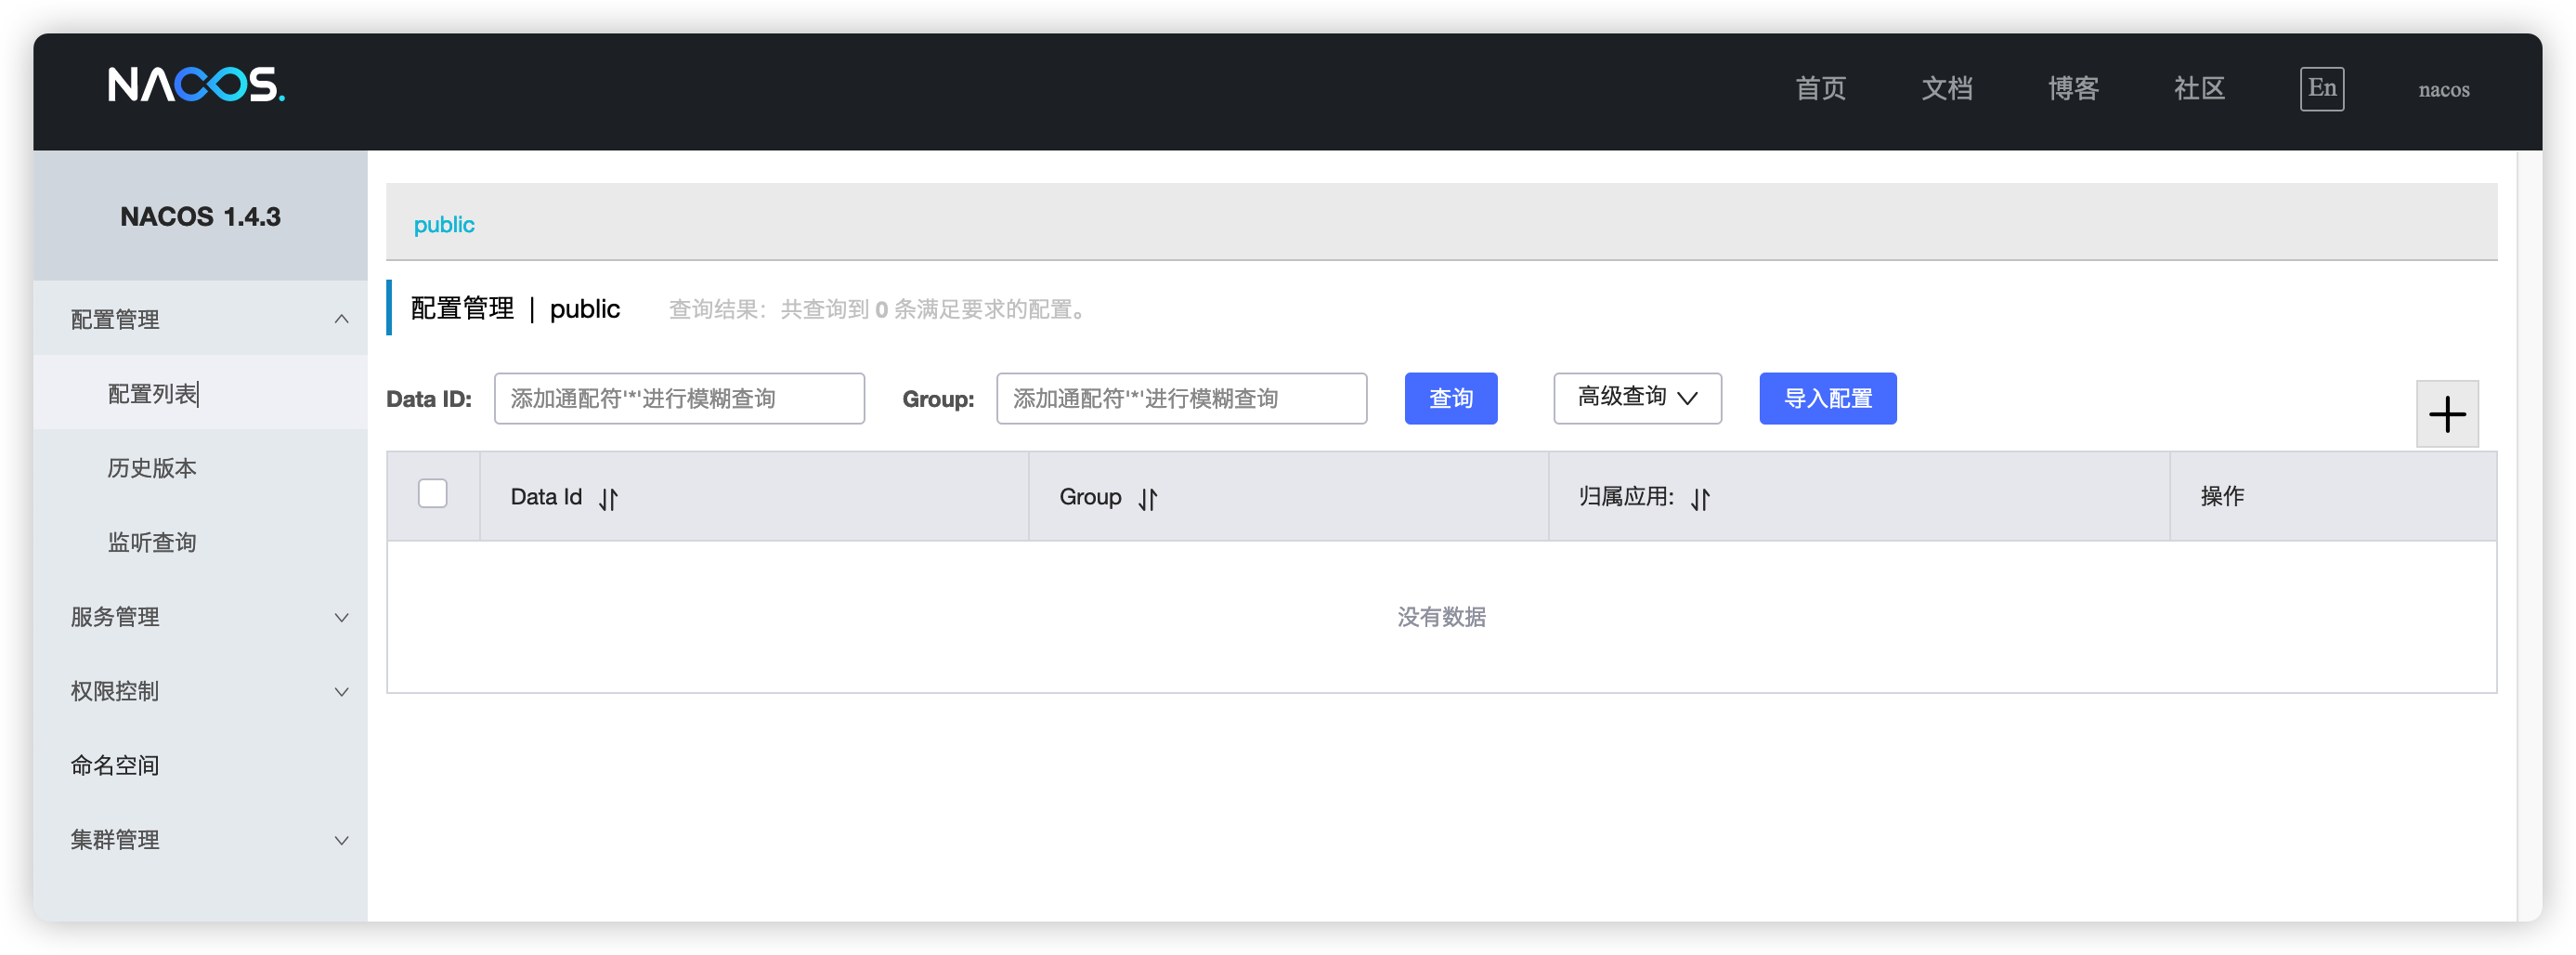
Nacos控制台安装
Nacos 控制台安装参考安装,安装之后解压到本地,进入安装 bin 目录中启动服务,启动命令如下:
Tips
standalone代表着单机模式运行,非集群模式
Warning
JDK17 环境下下载 1.x.x 版本,不会报错,edu项目中使用 nacos 版本为 1.4.3
启动成功之后进行访问,访问地址:http://localhost:8848/nacos/index.html#/login

Tips
登陆用户名密码都为 nacos
登陆成功界面如下:
服务关闭命令如下:
Nacos使用
Nacos 作为注册中心,如果想将一个服务注册到 Nacos 中,以项目 edu 的 edu-service-edu 模块为例,项目环境 SpringBoot 2.6.4,JDK17,分为以下几步:
项目父 pom 文件引入 SpringCloud、Spring Cloud Alibaba 依赖
<!-- 版本管理-->
<properties>
	<spring-cloud-dependencies.version>2021.0.1</spring-cloud-dependencies.version>
  <spring-cloud-alibaba-dependencies.version>2021.0.1.0</spring-cloud-alibaba-dependencies.version>
</properties>

<dependencyManagement>
  <dependencies>
    <!-- SpringCloud 依赖-->
    <dependency>
      <groupId>org.springframework.cloud</groupId>
      <artifactId>spring-cloud-dependencies</artifactId>
      <version>${spring-cloud-dependencies.version}</version>
      <type>pom</type>
      <scope>import</scope>
    </dependency>
    <!-- SpringCloud alibaba 依赖-->
    <dependency>
      <groupId>com.alibaba.cloud</groupId>
      <artifactId>spring-cloud-alibaba-dependencies</artifactId>
      <version>${spring-cloud-alibaba-dependencies.version}</version>
      <type>pom</type>
      <scope>import</scope>
    </dependency>
  </dependencies>
</dependencyManagement>
版本问题
注意SpringCloud、Spring Cloud Alibaba版本要与 SpringBoot 版本对应,可以先通过SpringCloud版本选择确定 SpringCloud 版本,在参考SpringBoot、Springcloud、SpringCloud Alibaba版本对应参考确定SpringCloud Alibaba版本。
edu-service-edu模块 pom 文件引入 Nacos 依赖<!-- nacos 服务注册 --> <dependency> <groupId>com.alibaba.cloud</groupId> <artifactId>spring-cloud-starter-alibaba-nacos-discovery</artifactId> </dependency>edu-service-edu模块配置文件添加注册 Nacos 服务的配置信息edu-service-edu模块启动类中添加Nacos服务发现注解@EnableDiscoveryClient@EnableDiscoveryClient //服务注册 @SpringBootApplication public class EduApplication { public static void main(String[] args) { SpringApplication.run(EduApplication.class, args); } }
启动服务,登陆Nacos,会发现 edu-service-edu微服务注册到了 Nacos 中

SpringCloud服务调用
OpenFeign概述
Feign 是 Spring Cloud 组件中的一个轻量级 RESTful 的 HTTP 服务客户端,整合了 Ribbon + Hystrix,用来做客户端负载均衡,去调用服务注册中心的服务
OpenFeign 是 Spring Cloud 在 Feign 的基础上支持了 Spring MVC 的注解,如 @RequesMapping 等,OpenFeign 的@FeignClient 可以解析 SpringMVC 的 @RequestMapping 注解下的接口,并通过动态代理的方式产生实现类,实现类中做负载均衡并调用其他服务
OpenFeign使用
项目中使用 OpenFeign 来调用 Nacos 注册中心中注册的服务,以项目 edu 为例,edu-service-edu 微服务中的 VideoController 接口类 deleteVideo() 调用 edu-service-vod微服务的 removeVideo() 方法,(edu-service-vod微服务已经注册到 Nacos 注册中心,参考Nacos使用)

步骤如下:
子 pom 文件中添加依赖:
<!--feign 服务调用-->
<dependency>
  <groupId>org.springframework.cloud</groupId>
  <artifactId>spring-cloud-starter-openfeign</artifactId>
</dependency>
调用端
edu-service-edu的启动类添加服务调用注解@EnableFeignClients@SpringBootApplication @EnableDiscoveryClient //服务注册 @EnableFeignClients // 服务调用 public class EduApplication { public static void main(String[] args) { SpringApplication.run(EduApplication.class, args); } }调用端
edu-service-edu定义远程 HTTP 调用 API 接口@FeignClient("edu-service-vod") @Component public interface VodClient { @DeleteMapping(value = "/eduvod/video/deleteVideoSource/{videoId}") public CommonResult removeVideo(@PathVariable("videoId") String videoId); }Tips
注解
@FeignClient标明需要调用的服务端的应用名称,在配置文件中spring.application.name配置,@DeleteMapping中定义请求服务的地址,请求edu-service-vod中接口类VodController的removeVideo()
配置好之后,便可以在edu-service-edu 微服务中调用edu-service-vod中的服务:

SpringCloud服务熔断与降级
Sentinel概述
背景
微服务架构中,系统拆分为不同的服务单元,各单元间通过服务注册与订阅的方式互相依赖。单元通过远程调用的方式相互通信,这样就有可能因为网络原因或是依赖服务自身问题出现调用故障或延迟,而这些问题会直接导致调用方的对外服务也出现延迟,若此时调用方的请求不断增加,最后就会出现因等待出现故障的依赖方响应而形成任务积压,最终导致自身服务的瘫痪
Spring Cloud 项目中最开始使用 Hystrix 来实现断路器的功能,具备拥有回退机制和断路器功能的线程和信号隔离,请求缓存和请求打包,以及监控和配置等功能,目前已经停止更新维护,
Sentinel 是Spring Cloud Alibaba核心组件之一,可以代替 Hystrix 来从流量控制、熔断降级、系统负载保护等多个维度保护服务的稳定性
Sentinel控制台安装
Sentinel 控制台提供一个轻量级的控制台,安装步骤如下:
从 release 页面 下载最新版本的控制台 jar 包
启动控制台
java -jar sentinel-dashboard.jar
# 或者
java -Dserver.port=8080 -Dcsp.sentinel.dashboard.server=localhost:8080 -Dproject.name=sentinel-dashboard -jar sentinel-dashboard.jar
Tips
1、若8080端口冲突,可使用
-Dserver.port=新端口进行设置2、
sentinel-dashboard.jar为下的 jar 包的具体名称,例如sentinel-dashboard-1.8.3.jar3、Sentinel 控制台登陆用户名密码为 sentinel
Warning
JDK 17环境下下载 Sentinel 控制台启动运行会出现各种意想不到的错误,建议本地使用 JDK1.8.x 环境,亲测
Sentinel1.8.3,JDK1.8.0可以正常启动运行 Sentinel 控制台启动后界面如下:

Sentinel限流
新建 SpringBoot 项目springboot-springcloud-sentinel,环境为 Jdk17,SpringBoot2.6.4, 项目中使用 Sentinel 步骤如下:
引入 Sentinel 依赖
<!--sentinel-->
<dependency>
    <groupId>com.alibaba.cloud</groupId>
    <artifactId>spring-cloud-starter-alibaba-sentinel</artifactId>
</dependency>
配置文件配置 Sentinel 控制台地址
server.port=8089
# 服务名
spring.application.name=sentineldemo
# Sentinel 控制台地址,如果配置在本地电脑,地址为 localhost:8080
spring.cloud.sentinel.transport.dashboard=101.43.164.126:8080
编写测试接口代码并测试
@RestController
public class TestController {
    @GetMapping(value = "/hello")
    public String hello() {
        return "hello sentinel!";
    }
}
我们可以看到 Sentinel 控制台监控了服务名为sentineldemo的服务,点击监控接口/hello后的流控按钮,为其设置一个简单的限流测试:
阀值类型设置为 QPS,单机阈值设置为 1 表示该接口每秒最多允许进入一个请求,测试接口当一秒内发起多于 1 次的请求后,便会出现“Blocked by Sentinel”的提示。

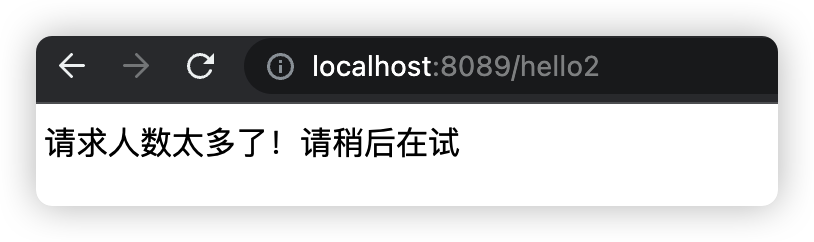
代码实现中也可以通过注解@SentinelResource来自定义限流行为,新增接口代码:
@GetMapping(value = "/hello2")
@SentinelResource(value = "byResource",blockHandler = "handleException")
public String hello2ByResource() {
  return "hello sentinel!";
}

public String handleException(BlockException exception){
  return "请求人数太多了!请稍后在试";
}
Tips
1、value = "byResource"表示按资源名限流,value = "byUrl"按 URL 限流,之后再在 Sentinel 控制台编辑流控规则

2、blockHandler用于限流处理,限流的请求会转发到handleException()方法中
Sentinel结合OpenFeign
Sentinel 适配了OpenFeign 组件,使用 OpenFeign 来进行服务间调用同时,也可以使用它来进行熔断操作,以OpenFeign使用为例,增加熔断功能,流程如下:
完成OpenFeign使用相关步骤
配置文件中打开 Sentinel 对 Feign 的支持
编写降级处理类
VodClientFallback,实现VodClient接口中定义的方法,用于处理服务降级逻辑@Component public class VodClientFallback implements VodClient { @Override public CommonResult removeVideo(String videoId) { return CommonResult.setCommonResult(ResultCode.ERROR,"删除视频出错了"); } }修改
VodClient接口上的注解@FeignClient("edu-service-vod"),使用fallback来声明降级处理的具体类@FeignClient(value = "edu-service-vod",fallback = VodClientFallback.class) @Component public interface VodClient { // ... }
参考文章:
SpringCloud GateWay 网关
Info
SpringCloud Gateway旨在为微服务架构提供简单、有效和统一的API路由管理方式,作为Spring Cloud生态系统中的网关,SpringCloud Gateway不仅提供统一的路由方式,并且还基于Filer链的方式提供了网关基本的功能,例如:安全、监控/埋点、限流等
项目edu最初使用nginx反向代理后端服务,并使用注解@CrossOrigin解决跨越问题,但存在安全、性能等问题,SpringCloud Gateway网关是一种有效的解决方案。以项目edu为例,若SpringBoot项目中含有多个微服务,配置网关服务步骤如下:
新建网关微服务
edu-infrastructure,并在pom文件中引入相关依赖<!-- nacos 服务注册 --> <dependency> <groupId>com.alibaba.cloud</groupId> <artifactId>spring-cloud-starter-alibaba-nacos-discovery</artifactId> </dependency> <!-- gateway网关 --> <dependency> <groupId>org.springframework.cloud</groupId> <artifactId>spring-cloud-starter-gateway</artifactId> </dependency> <dependency> <groupId>org.springframework.cloud</groupId> <artifactId>spring-cloud-starter-loadbalancer</artifactId> </dependency> <!--gson--> <dependency> <groupId>com.google.code.gson</groupId> <artifactId>gson</artifactId> </dependency> <!--服务调用--> <dependency> <groupId>org.springframework.cloud</groupId> <artifactId>spring-cloud-starter-openfeign</artifactId> </dependency>编写
application.properties配置文件# 服务端口 server.port=8222 # 服务名 spring.application.name=edu-service-gateway spring.main.web-application-type=reactive # nacos服务地址 spring.cloud.nacos.discovery.server-addr=127.0.0.1:8848 #使用服务发现路由 spring.cloud.gateway.discovery.locator.enabled=true #配置edu-service-acl服务 #设置路由id spring.cloud.gateway.routes[0].id=edu-service-acl #设置路由的uri spring.cloud.gateway.routes[0].uri=lb://edu-service-acl #设置路由断言,代理servicerId为auth-service的/auth/路径 spring.cloud.gateway.routes[0].predicates=Path=/*/acl/** #配置edu-service-edu服务 spring.cloud.gateway.routes[1].id=edu-service-edu spring.cloud.gateway.routes[1].uri=lb://edu-service-edu spring.cloud.gateway.routes[1].predicates=Path=/edu/** #配置edu-service-cms服务 spring.cloud.gateway.routes[2].id=edu-service-cms spring.cloud.gateway.routes[2].uri=lb://edu-service-cms spring.cloud.gateway.routes[2].predicates=Path=/educms/** #配置edu-service-msm服务 spring.cloud.gateway.routes[3].id=edu-service-msm spring.cloud.gateway.routes[3].uri=lb://edu-service-msm spring.cloud.gateway.routes[3].predicates= Path=/edumsm/** #配置edu-service-vod服务 spring.cloud.gateway.routes[4].id=edu-service-oss spring.cloud.gateway.routes[4].uri=lb://edu-service-oss spring.cloud.gateway.routes[4].predicates=Path=/oss/** #配置edu-service-vod服务 spring.cloud.gateway.routes[5].id=edu-service-vod spring.cloud.gateway.routes[5].uri=lb://edu-service-vod spring.cloud.gateway.routes[5].predicates=Path=/eduvod/** #配置edu-service-order服务 spring.cloud.gateway.routes[6].id=edu-service-order spring.cloud.gateway.routes[6].uri=lb://edu-service-order spring.cloud.gateway.routes[6].predicates=Path=/eduorder/** #配置edu-service-ucenter服务 spring.cloud.gateway.routes[7].id=edu-service-ucenter spring.cloud.gateway.routes[7].uri=lb://edu-service-ucenter spring.cloud.gateway.routes[7].predicates=Path=/educenter/**配置文件注意点
1、
spring.cloud.gateway.routes[]下标从0开始,id为路由id,没有固定规则要求,建议和服务名一致2、
lb://表示开启负载均衡,uri用来匹配提供服务的路由地址3、
predicates断言,路径相匹配的进行路由启动类
ApiGatewayApplication开启Nacos服务发现@SpringBootApplication @EnableDiscoveryClient //服务发现 public class ApiGatewayApplication { public static void main(String[] args) { SpringApplication.run(ApiGatewayApplication.class); } }修改后端前台项目
edu-admin配置文件.env.development端口服务号为网关服务端口8222VUE_APP_BASE_API = 'http://localhost:8222'编写配置类
CorsConfig解决跨越问题@Configuration public class CorsConfig { @Bean public CorsWebFilter corsFilter() { CorsConfiguration config = new CorsConfiguration(); config.addAllowedMethod("*"); config.addAllowedOrigin("*"); config.addAllowedHeader("*"); UrlBasedCorsConfigurationSource source = new UrlBasedCorsConfigurationSource(new PathPatternParser()); source.registerCorsConfiguration("/**", config); return new CorsWebFilter(source); } }Note
项目之前使用nginx解决跨越问题,使用Gateway网关解决跨越问题时,要注意将之前配置的
@CrossOrigin删除掉。
参考文章: