SpringBoot员工管理系统
- SpringBoot
员工管理系统 : 准备工作
Dao 层和 Pojo 层源码
创建新的项目 SpringBoot-EmployeeMana-01, Pojo 层创建类 Department 和类 Employee, Dao 层创建类 DepartmentDao 和类 EmployeeDao, 并模拟数据库生成数据, 源码如下 :
/**
 * 部门表
 */
@Data
@AllArgsConstructor
@NoArgsConstructor
public class Department {
    private Integer id;
    private String departmentName;
}

/**
 * 员工表
 */
@Data
@NoArgsConstructor
public class Employee {

    private Integer id;
    private String lastName;
    private String email;
    private Integer gender;//boy-1 girl-0
    private Department department;
    private Date birth;

  	public Employee(Integer id, String lastName, String email, Integer gender, Department department) {
        this.id = id;
        this.lastName = lastName;
        this.email = email;
        this.gender = gender;
        this.department = department;
        // 默认创建日期
        this.birth = new Date();
    }
}
@Repository
public class DepartmentDao {
    //模拟数据库的数据
    private static Map<Integer, Department> departments = null;

    static {
        departments = new HashMap<Integer, Department>();

        departments.put(101, new Department(101, "教学部"));
        departments.put(102, new Department(102, "市场部"));
        departments.put(103, new Department(103, "教研部"));
        departments.put(104, new Department(104, "运营部"));
        departments.put(105, new Department(105, "后勤部"));
    }

    //获取所有部门信息
    public Collection<Department> getDepartment() {
        return departments.values();
    }

    //通过 id 获取部门名称
    public Department getDepartmentById(Integer id) {
        return departments.get(id);
    }
}

@Repository
public class EmployeeDao {
    //模拟数据库的数据
    private static Map<Integer, Employee> employees = null;

    @Autowired
    private DepartmentDao departmentDao;

    static {
        employees = new HashMap<Integer, Employee>();

        employees.put(1001, new Employee(1001, "AA", "1013201176@qq.com", 1, new Department(101, "教学部")));
        employees.put(1002, new Employee(1002, "BB", "2013201176@qq.com", 0, new Department(102, "市场部")));
        employees.put(1003, new Employee(1003, "CC", "3013201176@qq.com", 0, new Department(103, "教研部")));
        employees.put(1004, new Employee(1004, "DD", "4013201176@qq.com", 1, new Department(104, "运营部")));
        employees.put(1005, new Employee(1005, "EE", "5013201176@qq.com", 1, new Department(105, "后勤部")));
    }

    //员工主键自增
    private static Integer initId = 1006;
    // 增加一个员工
    public void save(Employee employee) {
        if (employee.getId() == null) {
            employee.setId(initId++);
        }
        // 该行代码表明每次增加的员工一定有相对于的部门
        employee.setDepartment(departmentDao.getDepartmentById(employee.getDepartment().getId()));
        employees.put(employee.getId(), employee);
    }

    // 查询全部员工信息
    public Collection<Employee> getAll() {
        return employees.values();
    }

    // 通过 id 查询员工
    public Employee getEmployeeById(Integer id) {
        return employees.get(id);
    }

    // 删除员工信息通过 id
    public void delete(Integer id) {
        employees.remove(id);
    }
}
Lombok 的使用
Lombok在使用之前需要进行安装, 参考链接IDEA如何安装lombok插件(在线和离线两种方式)
Lombok 可以通过注解的方式, 在编译时自动为属性生成构造器, getter/setter, equals, hashcode, toString方法, 参考链接 : Java开发中用到的,lombok是什么?, 部分 lombok 标签含义:
| 标签 | 含义 |
|---|---|
@NoArgsConstructor | 用在类上, 自动生成无参构造函数 |
@AllArgsConstructor | 用在类上, 自动生成使用所有参数的构造函数 |
@Data | 注解在类上,相当于同时使用了@ToString、@EqualsAndHashCode、@Getter、@Setter和@RequiredArgsConstrutor这些注解 |
SpringBoot 项目中使用 Lombok 需要在 pom 文件中引入依赖 :
<dependency>
    <groupId>org.projectlombok</groupId>
    <artifactId>lombok</artifactId>
</dependency>
静态资源引入
静态资源模板可以在网上搜索 Bootstrap 模板下载使用, html 文件放在 templates 文件夹下, css、js、img 放在 static 文件夹下
员工管理系统 : 实现
员工管理系统 : 首页实现
首页配置 : 所有页面的静态资源都需要使用 Thymeleaf 接管
首页的实现需要一个 controller, 源码如下:
@Controller
public class IndexController {
    @RequestMapping({"/", "/index.html"})
    public String index() {
        return "index";
    }
}
或者在自定义 MVC 配置类 MyMvcConfig 中实现 :
@Configuration
public class MyMvcConfig implements WebMvcConfigurer {
    @Override
    public void addViewControllers(ViewControllerRegistry registry) {
        registry.addViewController("").setViewName("index");
    }
}

@Configuration
public class MyMvcConfig implements WebMvcConfigurer {
    @Override
    public void addViewControllers(ViewControllerRegistry registry) {
        registry.addViewController("/").setViewName("index");
        registry.addViewController("/index.html").setViewName("index");
    }
}
之后便可以删掉 controller 类 IndexController, 对 index.html 等文件里面的元素标签内容进行修改, 修改为 Thymeleaf 格式 :
第一步 : 要在 html 文件中引入 Thymeleaf 头文件
xmlns:th="http://www.thymeleaf.org"
第二步 : 修改 html 文件中非 Thymeleaf 语法的内容 :
html 中本地链接内容使用 th:href 修改, 并使用 @{} 进行取值
注意: 使用
@{/**}的形式代表项目的class目录, 即项目的根目录。找css文件夹下的.css文件, 可以直接写成@{/css/bootstrap.min.css},resources文件夹下的static、templates都是静态目录, 都不用写
<link href="asserts/css/bootstrap.min.css" rel="stylesheet">
修改为 :
<link th:href="@{/css/bootstrap.min.css}" rel="stylesheet">
src 修改为 th:src :
<img class="mb-4" src="asserts/img/bootstrap-solid.svg" alt="" width="72" height="72">
修改为 :
<img class="mb-4" th:src="@{/img/bootstrap-solid.svg}" alt="" width="72" height="72">
非本地链接不要修改 :
<a class="nav-link" href="http://getbootstrap.com/docs/4.0/examples/dashboard/#">Sign out</a>
可以在 yaml 文件添加以下内容 :
## 项目虚拟路径
server:
  servlet:
    context-path: /wyj
修改项目虚拟路径, 之后访问项目的时候则需要在 http://localhost:8080/ 加上 wyj, http://localhost:8080/wyj
之后项目启动会自动拼接 :
<link href="/wyj/css/bootstrap.min.css" rel="stylesheet">
员工管理系统 : 国际化
参考视频链接 : 员工管理系统 : 国际化
员工管理系统 : 登录功能实现
登录功能的实现, 登录之后 index.html 要跳转到一个 controller, 修改代码 :
跳转 action 使用 th:action 修改 :
<form class="form-signin" action="dashboard.html">
修改为 :
<form class="form-signin" th:action="@{/user/login}">
@{/user/login}为类 LoginController中写的登录跳转链接。将前端 index.html 输入的用户名 name="username" 和密码 name="password" 绑定到类 LoginController 的 login() 方法参数中(使用标签@RequestParam), 之后跳转到类 LoginController 进行页面的分发处理 :
<input type="text" name="username" class="form-control" placeholder="Username" required="" autofocus="">

<input type="password" name="password" class="form-control" placeholder="Password" required="">
@Controller
public class LoginController {
    @RequestMapping("/user/login")
    //@ResponseBody
    public String login(
            @RequestParam("username") String username,
            @RequestParam("password") String password,
            Model model) {
        // 具体业务
        if (!StringUtils.isEmpty(username) && password.equals("123456")) {
            return "dashboard";
        } else {
            // 用户名密码错误
            model.addAttribute("msg", "用户名或者密码错误!");
            return "index";
        }
    }
}
用户名或者密码输入正确, 跳转到 dashboard.html 页面, 用户名或者密码输入错误, 跳回到 index.html 页面, 并将错误信息显示出来, 错误信息显示需要在 index.html 文件中添加如下代码 :
<p style="color: #ff0000" th:text="${msg}" th:if="${not #strings.isEmpty(msg)}"></p>
以上代码表示如果 msg 不为空, 则将 msg 的信息显示到登录界面, Thymeleaf 中存在很多工具类, 如 #strings.isEmpty(msg) 表示 msg 消息是否为空, 具体参考Thymeleaf 表达式工具类
登录跳转成功之后, 跳转到 dashboard.html 页面, 会发现浏览器网址链接显示 :
http://localhost:8080/wyj/user/login?username=wyj&password=123456
为了更符合实际项目开发, 隐藏 user/login?username=wyj&password=123456 , 可以做一个简单的映射关系, 在类 MyMvcConfig 的 addViewControllers() 方法添加一行映射关系代码 :
registry.addViewController("main.html").setViewName("dashboard");
以上代码表示如何如果访问 main.html, 则会跳转到 dashboard.html 页面中, 在将类 LoginController 跳转到 dashboard.html 页面的代码修改 :
if (!StringUtils.isEmpty(username) && password.equals("123456")) {
    return "dashboard";
}
修改为 :
if (!StringUtils.isEmpty(username) && password.equals("123456")) {
    //网页重定向
    //return "dashboard";
    return "redirect:/main.html";
}
最终登录成功跳转到 dashboard.html 页面, 浏览器显示的链接为 :
http://localhost:8080/wyj/main.html
员工管理系统 : 登录拦截器
登录拦截器需要实现的功能为 : 员工在登录之后进行拦截, 判断用户是否有权限登录, 如果有则进行跳转, 否则退回到登录页面, 并提示用户没有权限登录。因此需要在 controller 的类 LoginController login() 方法中拿到用户信息, 并交给拦截器类进行用户权限的判断, 使用 Session 可以在多个页面之间进行信息传递
if (!StringUtils.isEmpty(username) && password.equals("123456")) {
    session.setAttribute("loginUser", username);
    //获取用户信息保存在 session 中,在拦截器类中拿到信息进行权限判断
    session.setAttribute("loginUser", username);
    //return "dashboard";
    return "redirect:/main.html";
}
拦截器的实现需要在 config 文件夹下创建类 LoginHandlerInterceptor, 实现接口 HandlerInterceptor, 并重写 preHandle() 方法
public class LoginHandlerInterceptor implements HandlerInterceptor {
    // preHandle() 在请求方法之前执行,返回值为boolean类型,true表示请求继续执行,false表示请求结束,postHandle()在请求处理完成,dispatcherServlet返回视图后执行
    @Override
    public boolean preHandle(HttpServletRequest request, HttpServletResponse response, Object handler) throws Exception {
        //登录成功之后, 拿到用户的 session 信息
        Object loginUser = request.getSession().getAttribute("loginUser");

        if (loginUser == null) { //进行权限判断
            request.setAttribute("msg", "没有权限, 请先登录");
            // 请求的分发, 退回到登录界面
            request.getRequestDispatcher("/index.html").forward(request, response);
            return false;
        } else {
            return true;
        }
    }

    @Override
    public void afterCompletion(HttpServletRequest request, HttpServletResponse response, Object handler, Exception ex) throws Exception { }

    @Override
    public void postHandle(HttpServletRequest request, HttpServletResponse response, Object handler, ModelAndView modelAndView) throws Exception { }
}
拦截器类 HandlerInterceptor 需要配置在 Bean 里面注册, 在 MVC 自定义配置类 MyMvcConfig 中重写方法 addInterceptors()
//将自定义拦截器注册到 Bean 里面
@Override
public void addInterceptors(InterceptorRegistry registry) {
    // addPathPatterns("/**") : 拦截所有请求
    // excludePathPatterns() : 不需要拦截的请求
    registry.addInterceptor(new LoginHandlerInterceptor())
            .addPathPatterns("/**")
            .excludePathPatterns("/index.html", "/", "/user/login", "/css/*", "/img/**", "/js/**");
}
登录成功之后, 在主界面 dashboard.html 显示登录的用户名, 修改 dashboard.html 以下内容 :
<a class="navbar-brand col-sm-3 col-md-2 mr-0" href="http://getbootstrap.com/docs/4.0/examples/dashboard/#">Company name</a>
修改为 :
<a class="navbar-brand col-sm-3 col-md-2 mr-0" href="http://getbootstrap.com/docs/4.0/examples/dashboard/#">[[${session.loginUser}]]</a>
注意 : html 中可以使用 [[${session.loginUser}]] 的方式取值
员工列表展示
后台编写
员工列表的展示首先需要在 controller 层写一个类 EmployeeController :
@Controller
public class EmployeeController {

    @Autowired
    EmployeeDao employeeDao;

    @RequestMapping("/emps")
    public String list(Model model) {
        // ctrl+alt+v 自动补全函数返回值
        Collection<Employee> employees = employeeDao.getAll();
        model.addAttribute("emps", employees);
        return "emp/list";
    }
}
th:fragment 提取公共页面
模板中,经常希望从其他模板中包含⼀些部分,如⻚眉,⻚脚,公共菜单等部分,为了做到这⼀点,
Thymeleaf可以使⽤th:fragment属性来定义被包含的模版⽚段,以供其他模版包含使用
th:fragment定义了需要 copy 的片段之后,可以使⽤th:insert或th:replace属性包含进需要的页面中
使用项目 SpringBoot-EmployeeMana-02 提取公共页面 : 侧边栏和头部导航栏内容

员工管理前端页面跳转地址的修改:
1、项目需求:点击 员工管理 ,跳转到list.html 页面显示当前员工的信息
修改
dashboard.html和list.html相应内容<li class="nav-item"> <a class="nav-link" href="http://getbootstrap.com/docs/4.0/examples/dashboard/#"> <svg xmlns="http://www.w3.org/2000/svg" width="24" height="24" viewBox="0 0 24 24" fill="none" stroke="currentColor" stroke-width="2" stroke-linecap="round" stroke-linejoin="round" class="feather feather-users"> <path d="M17 21v-2a4 4 0 0 0-4-4H5a4 4 0 0 0-4 4v2"></path> <circle cx="9" cy="7" r="4"></circle> <path d="M23 21v-2a4 4 0 0 0-3-3.87"></path> <path d="M16 3.13a4 4 0 0 1 0 7.75"></path> </svg> Customers </a> </li>修改为:
<li class="nav-item">
   <a class="nav-link" th:href="@{/emps}">
      <svg xmlns="http://www.w3.org/2000/svg" width="24" height="24" viewBox="0 0 24 24" fill="none" stroke="currentColor" stroke-width="2" stroke-linecap="round" stroke-linejoin="round" class="feather feather-users">
         <path d="M17 21v-2a4 4 0 0 0-4-4H5a4 4 0 0 0-4 4v2"></path>
         <circle cx="9" cy="7" r="4"></circle>
         <path d="M23 21v-2a4 4 0 0 0-3-3.87"></path>
         <path d="M16 3.13a4 4 0 0 1 0 7.75"></path>
      </svg>
      员工管理
   </a>
</li>
以上代码主要修改
href部分,使用th:href接管
2、抽取公共的代码部分(list.html和dashboard.html):侧边栏和顶部导航栏
dashboard.html页面,使用th:fragment抽取代码公共部分内容<!--顶部导航栏--> <nav class="navbar navbar-dark sticky-top bg-dark flex-md-nowrap p-0" > <!--...--> </nav> <!--侧边栏--> <nav class="col-md-2 d-none d-md-block bg-light sidebar"> <!--...--> </nav>修改为:
<!--顶部导航栏--> <nav class="navbar navbar-dark sticky-top bg-dark flex-md-nowrap p-0" th:fragment="topbar"> <!--...--> </nav> <!--侧边栏--> <nav class="col-md-2 d-none d-md-block bg-light sidebar" th:fragment="sidebar"> <!--...--> </nav>list.html页面使用
dashboard.html抽取的公共部分内容来组建list.html页面的侧边栏和顶部导航栏list.html页面的顶部导航栏<nav class="navbar navbar-dark sticky-top bg-dark flex-md-nowrap p-0" > <!--...--> </nav>使用代码
<div th:insert="~{dashboard::topbar}"></div>代替,
list.html页面的侧边栏<nav class="col-md-2 d-none d-md-block bg-light sidebar"> <!--...--> </nav>使用代码
<div th:insert="~{dashboard::sidebar}"></div>代替,以上代码使用到
Thymeleaf中的th:insert语法
3、进一步抽取公共的代码
公共代码部分侧边栏和头部导航栏内容可以单独抽取出来,放在一个单独的文件中
在
templates目录下面创建commons目录,在commons目录下面创建commons.html放公共代码将
dashboard.html中的侧边栏和头部导航栏代码提取出来放在commons.html中使用
th:replace在dashboard.html中补全公共代码部分,此时的公共代码部分在commons文件夹下的commons.html下<!--顶部导航栏--> <div th:replace="~{commons/commons::topbar}"></div> <!--侧边栏--> <div th:replace="~{commons/commons::sidebar}"></div>list.html补全方法与dashboard.html一样,th:replace和th:insert效果一样
侧边栏点中高亮功能
在侧边栏中,鼠标点中某一选项,该选项会高亮显示,如下图所示:

commons.html 中的代码
<a class="nav-link active" th:href="@{/main.html}">
active 表示高亮状态,当点击首页 选项的时候,调用 dashboard.html 中代码,此时可以在 dashboard.html 调用侧边栏代码部分传递一个参数,代码如下:
<div th:replace="~{commons/commons::sidebar}"></div>
修改为:
<div th:replace="~{commons/commons::sidebar(active='main.html')}"></div>
同理,list.html 代码修改如下:
<!--侧边栏-->
<div th:insert="~{commons/commons::sidebar(active='list.html')}"></div>
commons.html 接收该到参数 active 进行侧边栏显示的时候,使用 **Thymeleaf 三元运算符:if-then-else:(if)?(then):(else)**判断高亮显示哪一个鼠标点击事件
在 commons.html 中接受参数并进行判断代码修改如下:
<a class="nav-link active" th:href="@{/main.html}">
修改为:
<a th:class="${active=='main.html'?'nav-link active':'nav-link'}" th:href="@{/main.html}">
<a class="nav-link active" th:href="@{/emps}">
修改为:
<a th:class="${active=='list.html'?'nav-link active'?'nav-link'}" th:href="@{/emps}">
注意要使用 Thymeleaf 中的 th:class 替换 class ,以上代码整体片段如下:
<!--侧边栏-->
<nav class="col-md-2 d-none d-md-block bg-light sidebar" th:fragment="sidebar">
    <div class="sidebar-sticky">
        <ul class="nav flex-column">
            <li class="nav-item">
               <a th:class="${active=='main.html'?'nav-link active':'nav-link'}" th:href="@{/main.html}">

                  	.............
                    首页 <span class="sr-only">(current)</span>
                </a>
            </li>
            .............
            <li class="nav-item">
            	<a th:class="${active=='list.html'?'nav-link active':'nav-link'}" th:href="@{/emps}">

                    .............
                    员工管理
                </a>
            </li>
            .............
        </ul>
        .............
    </div>
</nav>
</html>
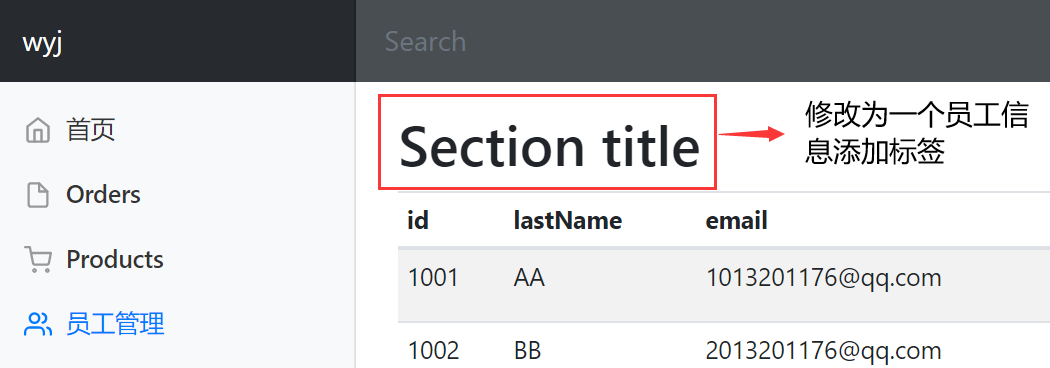
员工列表信息循环显示
员工列表循环显示修改 list.html 文件相应内容,<thead> 为表头,<tbody> 为表数据,代码如下:
<main role="main" class="col-md-9 ml-sm-auto col-lg-10 pt-3 px-4">
   <h2>Section title</h2>
   <div class="table-responsive">
      <table class="table table-striped table-sm">
         <thead>
            <tr>
               <th>id</th>
               <th>lastName</th>
               <th>email</th>
               <th>gender</th>
               <th>department</th>
               <th>birth</th>
               <th>操作</th>
            </tr>
         </thead>
         <tbody>
            <tr th:each="emp:${emps}">
               <td th:text="${emp.getId()}"></td>
               <td th:text="${emp.getLastName()}"></td>
               <td th:text="${emp.getEmail()}"></td>
               <td th:text="${emp.getGender()==0?'女':'男'}"></td>
               <td th:text="${emp.department.getDepartmentName()}"></td>
               <td th:text="${#dates.format(emp.getBirth(),'yyyy-MM-dd HH:mm:ss')}"></td>
               <td>
                  <button class="btn btn-sm btn-primary">编辑</button>
                  <button class="btn btn-sm btn-danger">删除</button>
               </td>
            </tr>

         </tbody>
      </table>
   </div>
</main>
注意: Thymeleaf 中的定义了许多对日期格式进行设置的方法,例如:
${#dates.format(date,'dd/MMM/yyyy HH:mm')}
添加员工信息
员工信息的添加需要单独编写一个Button按钮,BootStrap 官方网站 中提供了前端界面各类组件的代码,直接在其官网寻找所需要的组件代码拿来用即可
流程:
- 当点击
添加按钮时,跳转到员工信息添加界面add.html,界面add.html的头部导航栏和侧边栏仍然保持不变,因此需要在原有代码基础上创建一个添加界面add.html,该界面需要一个 Form 表单,用来添加员工信息。 - 在创建的 Form 表单中添加完员工信息之后,提交到一个
Controller,该Controller将表单信息进行处理,添加到员工列表中去 - 该
Controller最终返回全部员工信息展示到list.html界面
添加员工信息按钮代码
在 list.html 中找到 Section title 修改为一个 添加 按钮
<h2>Section title</h2>
修改为:
<h2>
    <a type="button" class="btn btn-secondary" th:href="@{/emp}">添加</a>
</h2>
当点击添加按钮时,可以将请求发送到对应的Controller

后台跳转 Controller 代码
使用 RestFul 分格来进行资源映射,在类EmployeeController编写后台Controller代码如下:
@GetMapping("/emp")
public String toAddPage(Model model) {
    Collection<Department> departments = departmentDao.getDepartment();
    model.addAttribute("departments",departments);
    return "emp/add";
}
toAddPage()进行请求分发,将视图员工信息添加页面add.html显示到前端

创建添加员工信息代码
员工信息添加
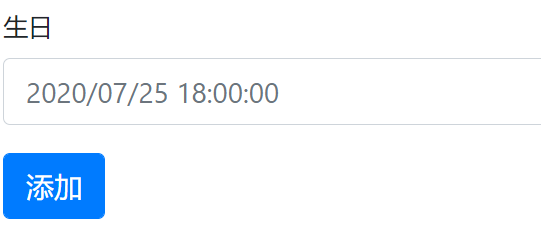
add.html代码如下:<main role="main" class="col-md-9 ml-sm-auto col-lg-10 pt-3 px-4"> <form th:action="@{/emp}" method="post"> <div class="form-group"> <label>姓名</label> <input type="text" name="lastName" class="form-control"> </div> <div class="form-group"> <label>邮箱</label> <input type="email" name="email" class="form-control" > </div> <div class="form-group"> <label>性别</label><br> <div class="form-check form-check-inline"> <input class="form-check-input" type="radio" name="gender" value="1"> <label class="form-check-label">男</label> </div> <div class="form-check form-check-inline"> <input class="form-check-input" type="radio" name="gender" value="0"> <label class="form-check-label">女</label> </div> </div> <div class="form-group"> <label>部门</label> <select class="form-control" name="department.id"> <option th:each="dept:${departments}" th:text="${dept.getDepartmentName()}" th:value="${dept.getId()}">1</option> </select> </div> <div class="form-group"> <label>生日</label> <input type="text" name="birth" class="form-control" placeholder="2020/07/25 18:00:00"> </div> <button type="submit" class="btn btn-primary">添加</button> </form> </main>add.html中,每一个标签设置一个name属性,name属性值和员工类Employee定义的属性字段名称需要一样,才可以一一映射,员工类Employee如下@Data @NoArgsConstructor public class Employee { private Integer id; private String lastName; private String email; private Integer gender;//boy-1 girl-0 private Department department; private Date birth; //... }属性
department是一个对象,类EmployeeDao中的save()方法每次增加一个新的员工信息时,该员工的部门名称是通过部门的id得到的,见save()方法如下代码:// 该行代码表明每次增加的员工一定有相对应的部门 employee.setDepartment(departmentDao.getDepartmentById(employee.getDepartment().getId()));因此在
add.html中,需要拿到部门的id传递到后台代码,add.html中通过代码th:value="${dept.getId()}"得到部门id,映射到name属性department.id上,具体代码如下:<div class="form-group"> <label>部门</label> <select class="form-control" name="department.id"> <option th:each="dept:${departments}" th:text="${dept.getDepartmentName()}" th:value="${dept.getId()}">1</option> </select> </div>
显示最终员工信息代码
员工信息通过add.html添加之后,点击添加按钮,会将员工信息通过Post请求的方式传递到后台Controller代码,映射URL仍然为/emp,体现了 RestFul 风格,后台Controller代码将新添加的员工信息保存在员工信息列表中,并展示到前端显示,Controller代码如下:
@Controller
public class EmployeeController {
    @Autowired
    DepartmentDao departmentDao;

   	//...省略部分代码

    @RequestMapping("/emps")
    public String list(Model model) {
        // ctrl+alt+v 自动补全函数返回值
        Collection<Employee> employees = employeeDao.getAll();
        model.addAttribute("emps", employees);
        return "emp/list";
    }

    @PostMapping("/emp")
    public String addEmp(Employee employee) {
        employeeDao.save(employee);
        return "redirect:/emps";
    }
}
日期格式修改
Spring中严格限制了日志格式的书写方式,默认是yyyy/MM/dd表达方式,如果写成yyyy-MM-dd,程序则会报错:
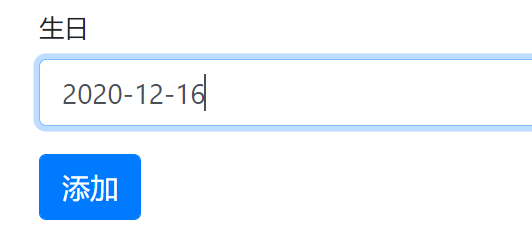
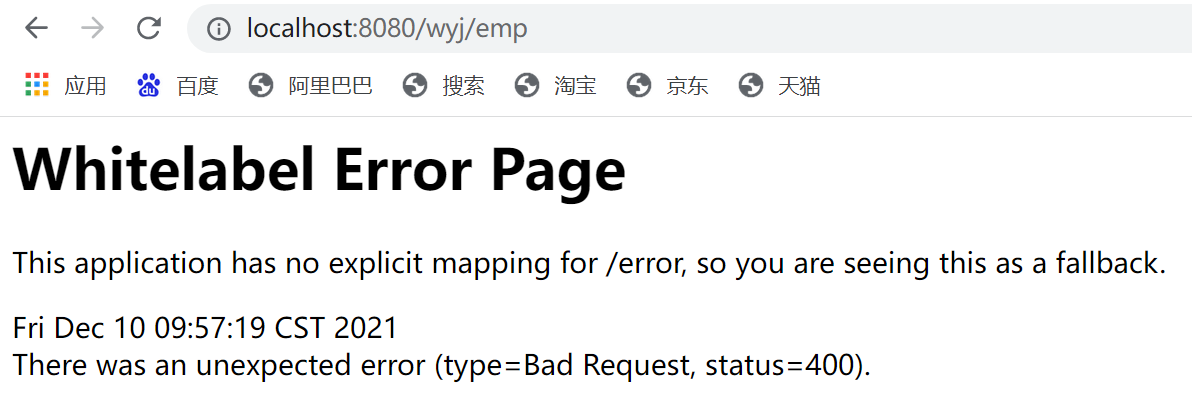
需要在 application.yaml 文件中添加配置来修改日期格式
##日期格式
spring:
  mvc:
    format:
      date: yyyy-MM-dd
修改员工信息
提交按钮代码
点击编辑按钮,跳转到后台Controller
<a type="button" class="btn btn-sm btn-primary" th:href="@{/emp/}+${emp.getId()}">编辑</a>

后台Controller代码
后台Controller拿到需要编辑的员工id,查询到该员工的信息以及所有部门信息,并将请求分发到员工信息更新页面update.html
@GetMapping("/emp/{id}")
public String toUpdateEmp(@PathVariable("id") Integer id, Model model) {
    //查出原来的数据
    Employee employee = employeeDao.getEmployeeById(id);
    model.addAttribute("emp", employee);
    //查出所有部门信息
    Collection<Department> departments = departmentDao.getDepartment();
    model.addAttribute("departments",departments);
    return "emp/update";
}
员工信息修改前端
员工信息更新页面先将当前员工的所有信息展示到界面上,姓名、邮箱等text属性使用th:value显示,性别等radio属性使用th:checked显示,部门属性(下拉框select属性)使用th:selected显示
<form th:action="@{/updateEmp}" method="post">
    <!--隐藏域-->
    <input type="hidden" name="id" th:value="${emp.getId()}">

    <div class="form-group">
        <label>姓名</label>
        <input th:value="${emp.getLastName()}" type="text" name="lastName" class="form-control">
    </div>

    <div class="form-group">
        <label>邮箱</label>
        <input th:value="${emp.getEmail()}" type="email" name="email" class="form-control"  >
    </div>

    <div class="form-group">
        <label>性别</label><br>
        <div class="form-check form-check-inline">
            <input th:checked="${emp.getGender()==1}" class="form-check-input" type="radio" name="gender" value="1">
            <label class="form-check-label">男</label>
        </div>
        <div class="form-check form-check-inline">
            <input th:checked="${emp.getGender()==0}" class="form-check-input" type="radio" name="gender" value="0">
            <label class="form-check-label">女</label>
        </div>

    </div>
    <div class="form-group">
        <label>部门</label>
        <select class="form-control" name="department.id">
            <option th:selected="${dept.getId()==emp.getDepartment().getId()}" th:each="dept:${departments}" th:text="${dept.getDepartmentName()}" th:value="${dept.getId()}">1</option>
        </select>
    </div>

    <div class="form-group">
        <label>生日</label>
        <input th:value="${#dates.format(emp.getBirth(), 'yyyy-MM-dd HH:mm:ss')}" type="text" name="birth" class="form-control" placeholder="2020/07/25 18:00:00">
    </div>

    <button type="submit" class="btn btn-primary">修改</button>
</form>
注意:
属性
生日使用Thymeleaf中#dates.format()对日期格式进行了转化使用隐藏域
type="hidden"来获取员工的id信息,使其不显示到前端界面中,但可以传递到后台Controller。<input type="hidden" name="id" th:value="${emp.getId()}">
员工信息修改后端
通过前端update.html修改的员工信息传递到后台Controller进行提交,代码如下:
@PostMapping("/updateEmp")
public String updateEmp(Employee employee) {
    System.out.println(employee.getId());
    employeeDao.save(employee);
    return "redirect:/emps";
}
注意:
employeeDao.save(employee)保存修改后的员工信息,如果在update.html中不使用隐藏域type="hidden"来获取员工的id信息,后端代码则获取不到员工的id信息,此时save()方法会创建出一个新的员工信息(由于id自增)而并非是修改原有员工信息
删除员工信息
list.html删除按钮代码<a type="button" class="btn btn-sm btn-danger" th:href="@{/delemp/}+${emp.getId()}">删除</a>后端Controller接收参数删除员工信息
@GetMapping("/delemp/{id}")
public String deleteEmp(@PathVariable("id") Integer id) {
	employeeDao.delete(id);
	return "redirect:/emps";
}
404 页面
SpringBoot的 404 页面只需要在templates文件夹下创建一个error文件夹,在error文件夹下创建一个404.html文件即可


当输入不存在或者错误的URL时候便会跳转到 404 错误页面
退出功能
点击退出按钮,退回到登录界面

在
commons.html中修改退出按钮代码<a class="nav-link" th:href="@{/user/logout}">退出</a>在
LoginController.java中编写注销页面代码@RequestMapping("/user/logout") public String logout(HttpSession session) { session.invalidate(); return "redirect:/index.html"; }